PlayNotch: Turn your MacBook Notch into a Cross-Platform Interactive Music Controller
What is there to do over Italy’s June 2 Republic Day holiday weekend? Exactly. While half the country was probably at the beach or firing up a barbecue, I was here on the couch, MacBook open, with an idea that had been buzzing in my head for weeks.
I had a simple but annoying problem: I use YouTube Music as my main player, and every time I wanted to change track, raise the volume, or hit pause, I had to go back to the browser tab, or click the menu bar, or hunt for the right window among the ten I already had open… in short, too many gestures for something that should be immediate. And then there is that notch - that black cutout at the top of the MacBook screen - which Apple has always treated like dead space, a decorative black hole.
“What if I put a music controller in there, like on the iPhone?”
Said and done. Welcome to PlayNotch.
My First Swift App: Survived (Barely)
Before we go any further: I am not a Swift developer. I mainly work with PHP and Python, and Swift was one of those things I kept telling myself I would learn “sooner or later.” Well, the June 2 holiday weekend turned out to be the “sooner or later.”
The good news is that you do not need Xcode. PlayNotch is built entirely with SwiftPM (Swift Package Manager) and Apple’s Command Line Tools. No 30GB graphical IDE, just code and terminal. For someone used to working from the CLI, that is already a civilized starting point.
The less good news is that Swift is… peculiar. The type system is strict, the compiler forgives nothing, and I spent the first hour fighting optionals and closures like they were old enemies. But then something clicks, and you start seeing the logic behind it. It is like the first time I learned generics in PHP 8: at first they look useless, and then suddenly you cannot live without them.
What PlayNotch Does (And Why You Might Actually Want It)
When you launch PlayNotch, you do not see any icon in the Dock - the app runs in the background as an “agent”-style app. What you do see is a small bar that sits on the notch. Move the cursor over it and boom: it expands into a card with all the information about the track that is currently playing.
Here is what you get inside the expanded card:
- Artwork, title, and artist of the current track
- Transport controls: previous, play/pause, next
- Scrubbable progress bar - yes, I think we are allowed to say that - so you can drag to a specific point, with hover preview for the position
- Volume control: scroll over the notch or use the slider
- Shuffle and repeat toggles (native on Apple Music and Spotify; YouTube Music handles them through its own player bar)
- Like/Favorite for the current track (Apple Music and YouTube Music; Spotify unfortunately does not allow it via AppleScript)
- Artwork-based theming (optional): a “vibrant” color is extracted from the cover art and applied to the card, the progress bar, and the toggles
- Blurred cover background (optional): the artwork becomes the card background, liquid effect included
- Quick system toggles (optional):
- Switch between Light, Dark, and Auto mode
- Keep the Mac awake with
caffeinate - Put the display to sleep
Everything is accessible without opening any app, without touching any menu. One hover and you have full control.
Multi-Player: The Precedence Game
One of the things I liked least about existing solutions is that they do not handle the case where you have multiple players open at the same time very well. Spotify in the background, Apple Music starting by accident, YouTube Music open in a browser…
PlayNotch solves this with a simple rule: last player to make sound wins. The player you started most recently takes control of the card. If you pause it, control automatically falls back to the one that is still playing. No manual configuration, no dropdown menu to choose the source.
The three supported players work in slightly different ways under the hood:
| Player | How it is controlled |
|---|---|
| Apple Music | Direct AppleScript to Music.app |
| Spotify | Direct AppleScript to Spotify.app |
| YouTube Music | JavaScript injected into the browser tab |
Precisely for YouTube Music - my main use case, and probably the most annoying one to support - there is a small one-time setup step: you need to enable “Allow JavaScript from Apple Events” in the browser. The reason is simple: YouTube Music does not expose an AppleScript interface like Apple Music or Spotify do, so PlayNotch injects JavaScript directly into the browser tab to read and control the player. You do it once, and it works with Safari, Chrome, Brave, Edge, and Arc.
How to Install It (It Is Easier Than It Looks)
You need macOS 14 or later and the Swift 6 toolchain (not Xcode, just the Command Line Tools). Then:
git clone https://github.com/MatteoAdamo82/PlayNotch.git
cd PlayNotch
./scripts/build_app.sh --run
The script does everything: builds in release mode, creates the .app bundle in build/, terminates any previous instance, and launches the app. On first run, macOS will ask for automation permissions for each player - that is normal, just click OK.
Important note: PlayNotch is ad-hoc signed, not notarized by Apple. On the very first launch, macOS may complain. The fix is to open it with right click -> “Open”, or go to System Settings -> Privacy & Security -> “Open Anyway”. It only happens once.
If you are running macOS 26 (in beta) like I am, it works there too.
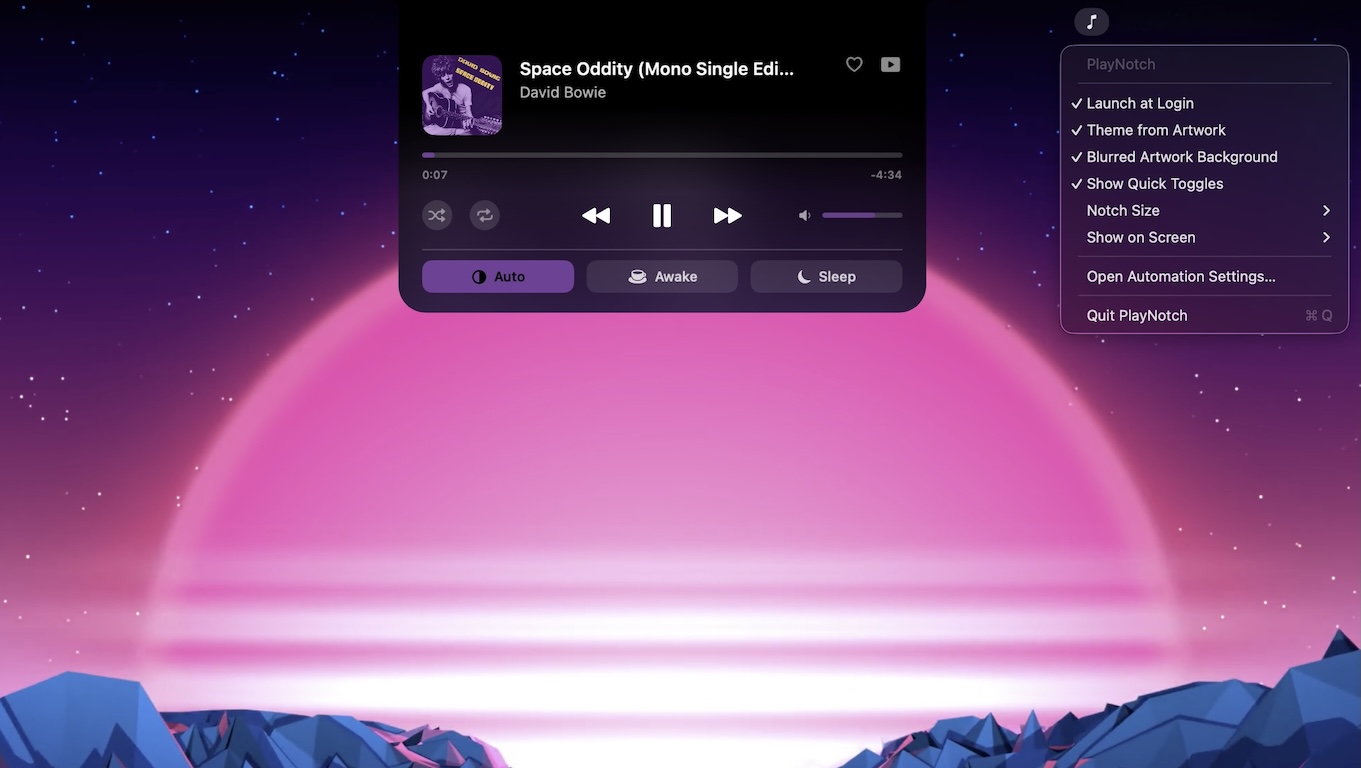
The Menu Bar Icon: Control Center for the Notch
Since there is no Dock icon, settings live in the menu bar - the ♪ icon is your access point. From there you can:
- Enable or disable Launch at Login
- Turn Theme from Artwork and Blurred Cover Background on or off
- Show or hide the Quick Toggles row
- Choose the notch size (Compact / Default / Large)
- Select which screen should show the notch (Show on Screen)
- Open macOS Automation settings
- Quit the app
Project Structure
For anyone curious about how the code is organized, the structure is fairly readable:
Sources/PlayNotch/
  main.swift
  AppDelegate.swift
  StatusItemController/    <- menu bar item
  Media/
    NowPlaying.swift       <- data model + MediaSource protocol
    AppleScriptRunner/     <- NSAppleScript helper
    AppleMusicSource/
    SpotifySource/
    YouTubeMusicSource/
    MediaController/       <- picks the active player
  Notch/
    NotchViewModel/        <- state, polling, artwork, accent color
    NotchView/             <- SwiftUI UI
    NotchWindow/           <- NSPanel above the menu bar
    NotchController/       <- screen geometry, mouse tracking
    PassthroughHostingView <- click pass-through outside the notch
    ColorExtraction/       <- vibrant color extraction from artwork
Polling happens once per second. The progress bar does not “jump” between one poll and the next because the position is interpolated locally - a small detail that makes a real difference in everyday use.
What Now?
The roadmap is already basically done for this first version:
- ✅ Progress bar + seek + volume
- ✅ Like / favorite and shuffle / repeat
- ✅ Artwork-based theming
- ✅ Menu bar icon with launch at login and screen picker
- ✅ Blurred artwork background and “liquid” animations
- ✅ Preferences (notch size, quick toggles, screen, theming)
- ✅ Control Center row (appearance, keep-awake, sleep display)
If you have ideas, bugs to report, or want to contribute, the repository is public on GitHub. PRs are welcome - also because, let us be honest, my Swift is still the Swift of someone who learned it over a holiday weekend.
P.S. All right, next time I will seriously consider the radical option of inviting a few friends over for a proper barbecue in the yard and spending a holiday weekend like a normal person. Maybe.